3ds max has a great set of 6 different types of windows, which you can create with just few clicks. These are very common in any architectural projects, so I find myself using them most of the time with no need to import any special window frame.
In this tutorial I’ll demonstrate how to create and customize a basic sliding window, but you can implement the same steps on any other type as well.
Note that every window has some additional settings, so feel free to play with them and understand how they work.
Create an opening in the wall
I’ll start by creating a wall from a basic box of 300X300X25 cm and convert it to editable poly. Next I’ll select the vertical segments and use the connect tool with 2 segments. Double click on each of the segments to select the whole loop and re-position its height.

Select the horizontal lines and use the connect tool again, this time with only one segment. Double click on the segment and use the chamfer tool to split it two lines. To get an opening of 100 cm, set the chamfer value to half of that.

Select the front and back polygons where the window should be and bridge them together.

Create a sliding window
Go to the create panel, from the drop down menu select windows and then sliding window. To position the window precisely inside the wall opening, you need to turn snap mode on (press “S”), make sure that “vertex” is selected under the snap setting.

Click and drug at the bottom of the opening from one corner to the other. Next click is for the thickness and last one for the height. Right click to end the window creation.
Now it’s time to change some of the frame parameters, select the window and go to modify panel. As you can see, from here you can adjust the overall size of the window, the thickness of the outer frame, glazing, rails and panels, as well as opening direction and mapping coordinates.
First let’s tick off “Hung” under “open window”, so the panels will slide horizontally. Next, I’ll set the overall depth to about 8 cm, the frame horizontal and vertical width to 4 cm, and the rail width to 2.5 cm.
To make the panels a bit more interesting I’ll add 2 horizontal panels and 3 vertical ones. Feel free to change these parameters as you see fit.

Add materials
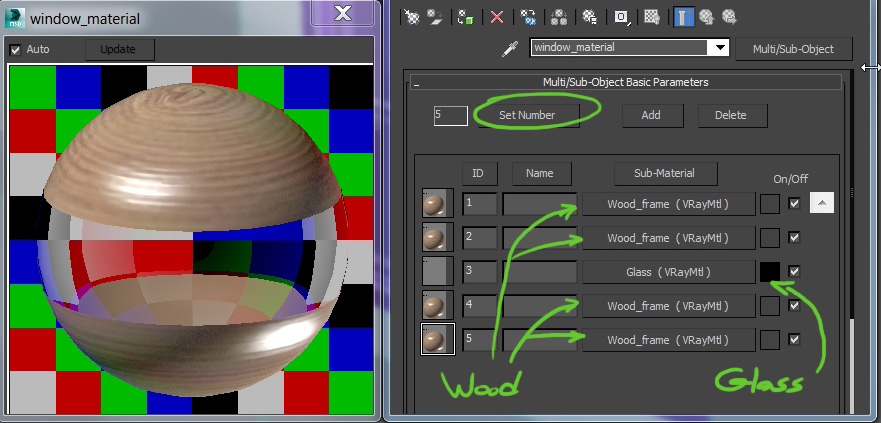
All 3ds max windows have 5 material IDs by default. IDs 1,2,4,5 are for different parts of the frame and ID 3 is for the glass material. So actually I’ll be using only 2 materials for this window, one for the frame and one for glazing.
To set it up, go to the material editor, add Multi/sub-object and set the number of materials to 5.
In the first slot, add a new Vray material and name it “Wood frame”, instance it to slots 2,4,5. Click on slot number 3 and add a new Vray material, name it “Glass”.
To make the wood texture face the right direction on each of the frame’s elements, simply click on “Generate Mapping Coords” at the bottom of the window settings. Select the wood texture and adjust its size by changing its tiling parameters.
Customize the window
Now that we have our basic window, we can customize it further more by moving some vertex and elements. You can either convert the object into editable poly or add an “edit poly” modifier to it so you could still undo any change by deleting the modifier.
Select and move some of the vertex to give the window a new look.

If the windows are close to the camera like in an interior scene for example, then it’s a good idea to add more details, by chamfering the hard edges of the frame so nice highlights will be introduced in the render. Select all the vertical and horizontal segments and apply a chamfer of about 0.35 cm. Add 3-4 steps to make it rounder.
I have trouble in using the material.I really dont get it on how to assign materials and texture at all in 3ds max and I really need help on this.Especially on this window thing